 WCF技术剖析之一一步步创建一个完整的分布式事务应用.docx
- 文档编号:27478819
- 上传时间:2023-07-02
- 格式:DOCX
- 页数:15
- 大小:20.96KB
WCF技术剖析之一一步步创建一个完整的分布式事务应用.docx
《WCF技术剖析之一一步步创建一个完整的分布式事务应用.docx》由会员分享,可在线阅读,更多相关《WCF技术剖析之一一步步创建一个完整的分布式事务应用.docx(15页珍藏版)》请在冰豆网上搜索。
WCF技术剖析之一一步步创建一个完整的分布式事务应用
WCF技术剖析之一:
一步步创建一个完整的分布式事务应用
在完成了对于WCF事务编程(《上篇》、《中篇》、《下篇》)的介绍后,本篇文章将提供一个完整的分布式事务的WCF服务应用,通过本例,读者不仅仅会了解到如何编程实现事务型服务,还会获得其他相关的知识,比如DTC和AS-AT的配置等。
本例还是沿用贯通本章的应用场景:
银行转帐。
我们将会创建一个BankingService服务,并将其中的转帐操作定义成事务型操作。
我们先从物理部署的角度来了解一下BankingService服务,以及需要实现怎样的分布式事务。
一、从部署的角度看分布式事务
既然是实现分布式事务,那么事务会跨越多台机器。
简单起见,我使用两台机器来模拟。
有条件的读者可以在自己的局域网中进行练习,如果你没有局域网可用,你可以使用虚拟机来模拟局域网。
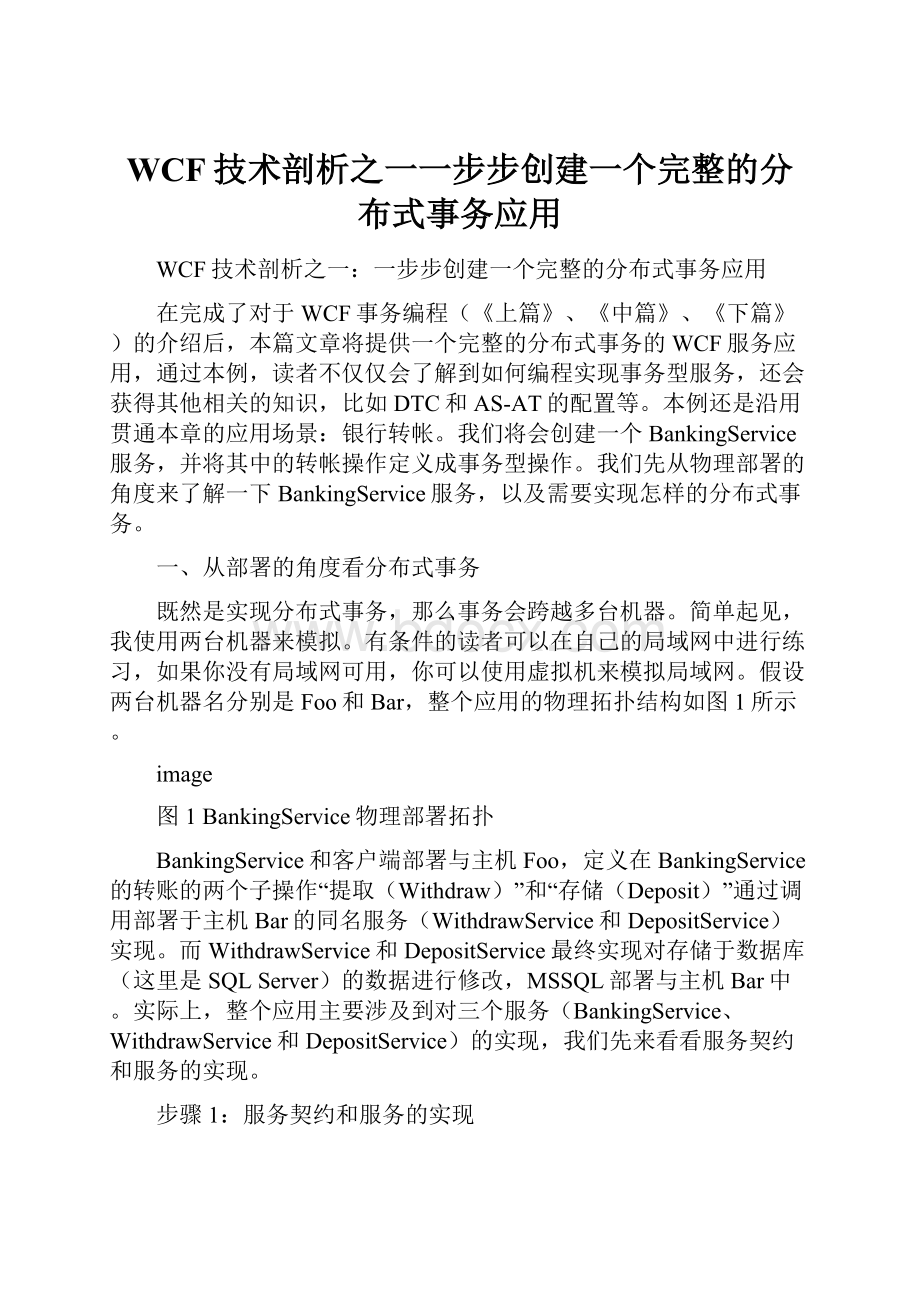
假设两台机器名分别是Foo和Bar,整个应用的物理拓扑结构如图1所示。
image
图1BankingService物理部署拓扑
BankingService和客户端部署与主机Foo,定义在BankingService的转账的两个子操作“提取(Withdraw)”和“存储(Deposit)”通过调用部署于主机Bar的同名服务(WithdrawService和DepositService)实现。
而WithdrawService和DepositService最终实现对存储于数据库(这里是SQLServer)的数据进行修改,MSSQL部署与主机Bar中。
实际上,整个应用主要涉及到对三个服务(BankingService、WithdrawService和DepositService)的实现,我们先来看看服务契约和服务的实现。
步骤1:
服务契约和服务的实现
我们仍然采用契约共享的方式将服务契约定义在单独的项目之中,共服务端和客户端共享。
涉及到的三个服务对应的服务契约定义如下,事务型操作的TransactionFlow选项被设置为Allwed(默认值)。
IBankingService:
1:
usingSystem.ServiceModel;
2:
namespaceArtech.TransactionalService.Service.Interface
3:
{
4:
[ServiceContract(Namespace="
5:
publicinterfaceIBankingService
6:
{
7:
[OperationContract]
8:
[TransactionFlow(TransactionFlowOption.Allowed)]
9:
voidTransfer(stringfromAccountId,stringtoAccountId,doubleamount);
10:
}
11:
}
IWithdrawService:
1:
usingSystem.ServiceModel;
2:
namespaceArtech.TransactionalService.Service.Interface
3:
{
4:
[ServiceContract(Namespace="
5:
publicinterfaceIWithdrawService
6:
{
7:
[OperationContract]
8:
[TransactionFlow(TransactionFlowOption.Allowed)]
9:
voidWithdraw(stringaccountId,doubleamount);
10:
}
11:
}
IDepositService:
1:
usingSystem.ServiceModel;
2:
namespaceArtech.TransactionalService.Service.Interface
3:
{
4:
[ServiceContract(Namespace="
5:
publicinterfaceIDepositService
6:
{
7:
[OperationContract]
8:
[TransactionFlow(TransactionFlowOption.Allowed)]
9:
voidDeposit(stringaccountId,doubleamount);
10:
}
11:
}
实现了服务操作的IWithdrawService和IDepositService的WithdrawService和DepositService分别实现基于给定银行账户的提取和存储操作。
限于篇幅的问题,具体对数据库相应数据的更新操作就不再这里一一介绍了。
下面是WithdrawService和DepositService的定义,由于不管是单独被调用,还是作为转帐的一个子操作,Withdraw和Deposit操作均需要在一个事务中执行,所以我们需要通过应用OperationBehaviorAttribute将TransactionScopeRequired属性设为True。
WithdrawService:
1:
usingSystem.ServiceModel;
2:
usingArtech.TransactionalService.Service.Interface;
3:
namespaceArtech.TransactionalService.Service
4:
{
5:
publicclassWithdrawService:
IWithdrawService
6:
{
7:
[OperationBehavior(TransactionScopeRequired=true)]
8:
publicvoidWithdraw(stringaccountId,doubleamount)
9:
{
10:
//省略实现
11:
}
12:
}
13:
}
DepositService:
1:
usingSystem.ServiceModel;
2:
usingArtech.TransactionalService.Service.Interface;
3:
namespaceArtech.TransactionalService.Service
4:
{
5:
publicclassDepositService:
IDepositService
6:
{
7:
[OperationBehavior(TransactionScopeRequired=true)]
8:
publicvoidDeposit(stringaccountId,doubleamount)
9:
{
10:
//省略实现
11:
}
12:
}
13:
}
定义在BankingService的Transfer操作就是调用上述的两个服务,由于服务调用设置到对服务代理的关闭以及异常的处理(相关的内容在《WCF技术剖析(卷1)》的第8章有详细的介绍),为了实现代码的复用,我定义了一个静态的ServiceInvoker类。
ServiceInvoker定义如下,泛型方法Invoke
Invoke
1:
usingSystem;
2:
usingSystem.ServiceModel;
3:
namespaceArtech.TransactionalService.Service.Interface
4:
{
5:
publicstaticclassServiceInvoker
6:
{
7:
publicstaticvoidInvoke
8:
{
9:
Guard.ArgumentNotNull(action,"action");
10:
Guard.ArgumentNotNullOrEmpty(endpointConfigurationName,"endpointConfigurationName");
11:
12:
using(ChannelFactory
13:
{
14:
TChannelchannel=channelFactory.CreateChannel();
15:
using(channelasIDisposable)
16:
{
17:
try
18:
{
19:
action(channel);
20:
}
21:
catch(TimeoutException)
22:
{
23:
(channelasICommunicationObject).Abort();
24:
throw;
25:
}
26:
catch(CommunicationException)
27:
{
28:
(channelasICommunicationObject).Abort();
29:
throw;
30:
}
31:
}
32:
}
33:
}
34:
}
35:
}
那么,借助于ServiceInvoker,BankingService的定义就很简单了。
对于Transfer操作,我们依然通过OperationBehaviorAttribute特性将TransactionScopeRequired设置成True。
1:
usingSystem;
2:
usingSystem.Collections.Generic;
3:
usingSystem.ServiceModel;
4:
usingArtech.TransactionalService.Service.Interface;
5:
namespaceArtech.TransactionalService.Service
6:
{
7:
publicclassBankingService:
IBankingService
8:
{
9:
[OperationBehavior(TransactionScopeRequired=true)]
10:
publicvoidTransfer(stringfromAccountId,stringtoAccountId,doubleamount)
11:
{
12:
ServiceInvoker.Invoke
13:
ServiceInvoker.Invoke
14:
}
15:
}
16:
}
步骤2:
部署服务
BankingService和依赖的WithdrawService与DepositService已经定义好了,现在我们需要对它们进行部署。
本实例采用基于IIS的服务寄宿方式,在进行部署之前需要为三个服务创建.svc文件。
在这里,我.svc文件命名为与服务类型相同的名称(BankingService.svc、WithdrawService.svc和DepositService.svc)。
关于.svc文件的具体定义,在这里就不再重复介绍了,对此不了解的读者,可以参阅《WCF技术剖析(卷1)》第7章关于IIS服务寄宿部分。
我们需要分别在主机Foo和Bar上创建两个IIS虚拟目录(假设名称为Banking),并将定义服务契约和服务类型的两个程序集拷贝到Foo\Banking\Bin和Bar\Banking\Bin。
然后再将BankingService.svc拷贝到Foo\Banking下,将WithdrawService.svc和DepositService.svc拷贝到Bar\Banking下。
最后,我们需要创建两个Web.config,分别拷贝到Foo\Banking\Bin和Bar\Banking下面。
下面两段XML代表两个Web.config的配置。
Foo\Banking\Web.config:
1:
xmlversion="1.0"encoding="utf-8"?
>
2:
3:
4:
5:
6:
7:
8:
9:
10:
11:
12:
13:
14:
15:
16:
17:
18:
19:
20:
21:
22:
Bar\Banking\Web.config:
1:
xmlversion="1.0"encoding="utf-8"?
>
2:
3:
4:
5:
6:
7:
8:
9:
10:
11:
12:
13:
14:
15:
16:
17:
18:
19:
//Bar/banking/withdrawservice.svc"binding="customBinding"bindingConfiguration="transactionalBinding" 20: contract="Artech.TransactionalService.Service.Interface.IWithdrawService"/> 21: //Bar/banking/depositservice.svc"binding="customBinding"bindingConfiguration="transactionalBinding" 22: contract="Artech.TransactionalService.Service.Interface.IDepositService"/> 23: 24: 25: 步骤3: 调用BankingService 现在我们已经部署好了定义的三个服务,现在我们可以调用它们实施转帐处理了。 我们可以像调用普通服务一样调用BankingService,无须考虑事务的问题。 因为我们通过OperationBehaviorAttribute特性将BankingService的Transfer操作的TransactionScopeRequired设置成True,这会确保整个操作的执行是在一个事务中进行(可能是流入的事务,也可能是重新创建的事务)。 下面进行转帐处理的客户端代码和配置。 1: stringfromAccountId="123456789"; 2: stringtooAccountId="987654321"; 3: doubleamount=1000; 4: ServiceInvoker.Invoke 配置: 1: xmlversion="1.0"encoding="utf-8"? > 2: 3: 4: 5: 6: 7: 8: 9: 10: 11: 12: 13: 14: //Foo/banking/bankingservice.svc" 15: binding="customBinding"bindingConfiguration="transactionalBinding"contract="Artech.TransactionalService.Service.Interface.IBankingService" 16: name="bankingservice"/> 17: 18: 19: 实际上,由于定义在BankingService的Transfer操作完全是通过调用WithdrawService和DepositService实现的,我们也可以绕过BankingService直接调用这两个服务实现转账的处理。 为此我们需要在配置中添加调用WithdrawService和DepositService的终结点: 1: xmlversion="1.0"encoding="utf-8"? > 2: 3: 4: ...... 5: 6: //Bar/banking/withdrawservice.svc"binding="customBinding"bindingConfiguration="transactionalBinding"contract="Artech.TransactionalService.Service.Interface.IWithdrawService"/> 7: //Bar/banking/depositservice.svc"binding="customBinding"bindingCfiguration="transactionalBinding"contract="Artech.TransactionalService.Service.Interface.IDepositService"/> 8: 9: 10: 由于整个转帐的操作必须纳入到一个事务中进行,并且客户端主动发起对WithdrawService和DepositService两个服务的调用,所以客户端是事物的初始化者。 为此,我们需要将对这两个服务的调用放到一个TransactionScope中进行,相应的代码如下所示: 1: stringfromAccountId="123456789"; 2: stringtooAccountId="987654321"; 3: doubleamount=1000;


- 配套讲稿:
如PPT文件的首页显示word图标,表示该PPT已包含配套word讲稿。双击word图标可打开word文档。
- 特殊限制:
部分文档作品中含有的国旗、国徽等图片,仅作为作品整体效果示例展示,禁止商用。设计者仅对作品中独创性部分享有著作权。
- 关 键 词:
- WCF 技术 剖析 之一 一步步 创建 一个 完整 分布式 事务 应用
 冰豆网所有资源均是用户自行上传分享,仅供网友学习交流,未经上传用户书面授权,请勿作他用。
 《C12343098汽轮机操作规程》要点.docx
-
《钢丝绳芯输送带硫化接头标准》.docx
-
《建筑装饰CAD》课程标准.docx
-
《劳动合同书》范本下载.docx
-
《普通话实用训练教程》教案 1.docx
-
《上海星河湾土方道路景观铺装景观建筑景观小品绿化种植及配套水电安装工程施工组织设计》教学.docx
-
#2#014年护士执业资格考试考前押题卷实践能力.docx
-
《繁荣世界守护者》图文流程攻略.docx
-
《工业设计机械基础》复习题.docx
-
《机电一体化系统设计》思考题.docx
-
《Java项目实训》课程设计计算器要点.docx
-
《赤壁赋》必修一9.docx
-
《工商企业经营管理》重点复习题供参考.docx
-
《审计准则第1322号公允价值计量和披露的审计》指南全解.docx
-
《索溪峪的野》课堂教学实录文档资料.docx
-
《餐饮服务与管理》教学计划复习进程.docx
-
《花卉栽培》试题库完整.docx
-
《经络学B》答案.docx
-
《身边地化学物质》知识点汇总情况.docx
-
《5鲁滨逊漂流记》教学设计和教案附同步练习.docx
-
《送别组诗》教案.docx
-
《Visual Basic程序设计基础》课后习题参考答案.docx
-
《创新与企业家精神》.docx
-
《詹天佑》教学反思说课稿教学设计教材.docx
-
《风力发电机组设计方案与制造》课程设计方案任务书.docx
-
《最后的姿势》教学设计.docx
-
1楼无机保温砂浆外墙外保温涂料饰面1分解.docx
-
5篇学校工作开展情况述职报告.docx
-
6届高三上学期一轮纠错生物试题附答案.docx
-
《图书馆学概论》知识点.docx
-
《语言学导论》期末复习及练习.docx
-
02煤矿电能质量治理技术的研究与应用计划任务书.docx
-
20XX生产车间管理方案.docx
-
矿井安全质量标准化管理办法.docx
-
苏教版一年级数学下册教案第二单元认识图形二优选.docx
-
完整版计算机组成原理课后答案唐朔飞第二版.docx
-
有机化学练习题DOC.docx
-
有源逆变概念及工作原理.docx
-
涂装作业安全规程安全管理通则.docx
-
五年级上册生命教育教案.docx
-
中班我会穿衣服的教案20篇.docx
-
北师大版五年级上册英语教案.docx
-
会计师事务所内部管理制度.docx
-
舞蹈生自我评价.docx
-
第六章微分中值定理.docx
-
小升初语文阅读大宝典经典荟萃.docx
-
箱涵基坑土方开挖专项施工方案已改.docx
-
java期末考试题.docx
-
四大名著神点评+值得背下来的金句条条都是作文提分好素材.docx
-
小型校园网络规划与设计方案.docx
-
浅议体验式旅游背景下导游的发展方向改版.docx
