 Android 面试题总结之Android 进阶二.docx
- 文档编号:28738319
- 上传时间:2023-07-19
- 格式:DOCX
- 页数:37
- 大小:1,018.20KB
Android 面试题总结之Android 进阶二.docx
《Android 面试题总结之Android 进阶二.docx》由会员分享,可在线阅读,更多相关《Android 面试题总结之Android 进阶二.docx(37页珍藏版)》请在冰豆网上搜索。
Android面试题总结之Android进阶二
Android面试题总结之Android进阶
(二)
掌握
Window是什么?
View的绘制流程
View的事件分发机制
View与SurfaceView,GLSurfaceView
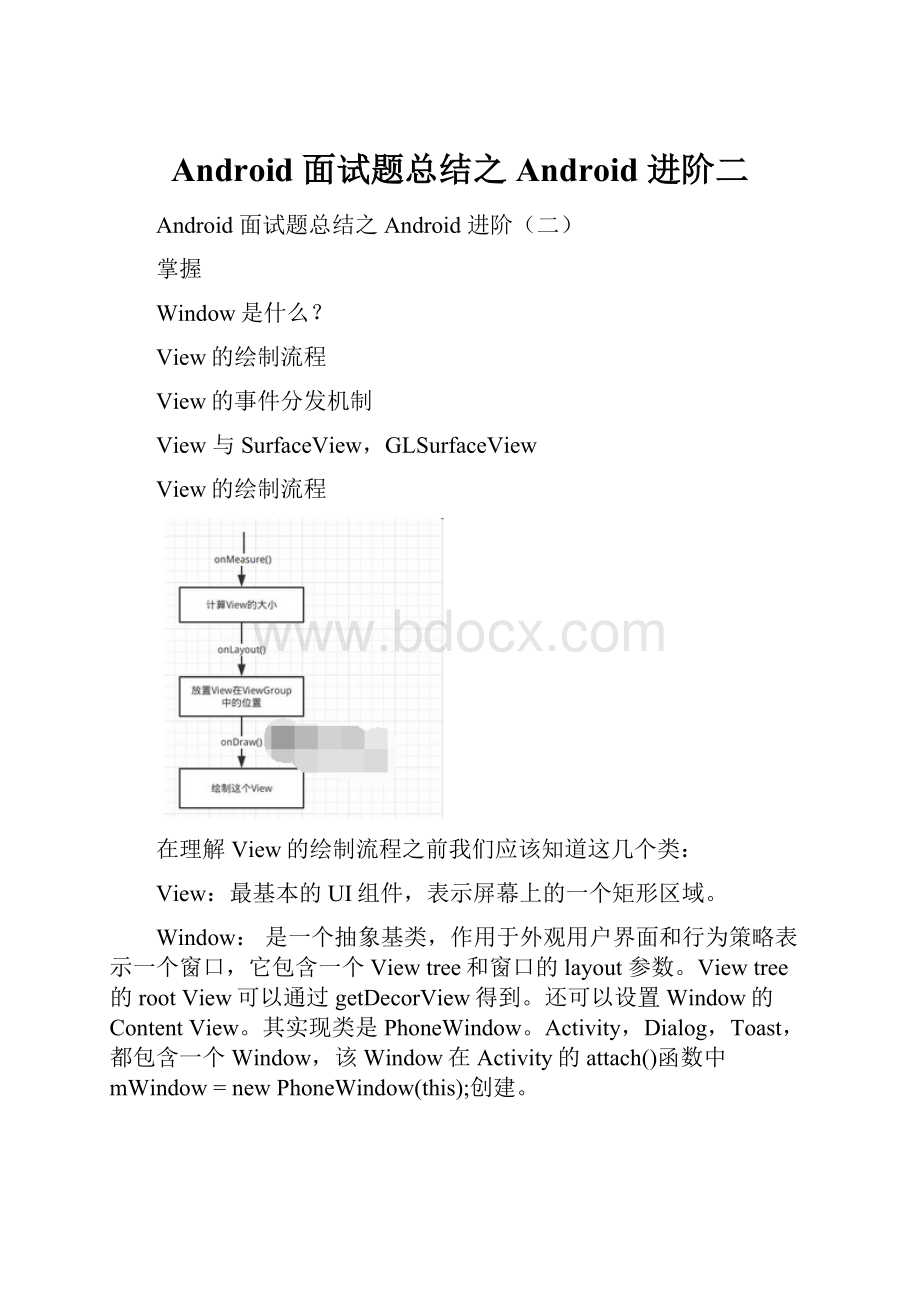
View的绘制流程
在理解View的绘制流程之前我们应该知道这几个类:
View:
最基本的UI组件,表示屏幕上的一个矩形区域。
Window:
是一个抽象基类,作用于外观用户界面和行为策略表示一个窗口,它包含一个Viewtree和窗口的layout参数。
Viewtree的rootView可以通过getDecorView得到。
还可以设置Window的ContentView。
其实现类是PhoneWindow。
Activity,Dialog,Toast,都包含一个Window,该Window在Activity的attach()函数中mWindow=newPhoneWindow(this);创建。
DecorView:
该类是PhoneWindow类的内部类,继承自FrameLayout,它是所有应用窗口的根View,PhoneWindow设置DecorView为应用窗口的根视图。
PhoneWindow:
PhoneWindow对象帮我们创建了一个PhoneWindow内部类DecorView(父类为FrameLayout)窗口顶层视图
ViewRootImpl:
ViewRootImpl是连接WindowManager与DecorView的纽带,View的整个绘制流程的三大步(measure、layout、draw)以及我们一些addView()的操作,都是通过ViewRootImpl完成的。
WindowManager:
应用程序界面和窗口管理器
在ActivityonCreate使用的setContentView()就是设置的ContentView,通过LayoutInflater将xml内容布局解析成View树形结构添加到DecorView顶层视图中id为content的FrameLayout父容器上面。
那么DecorView是如何绘制的呢?
我们分两个步骤来理解:
DecorView添加到Window的过程
DecorView的绘制过程
DecorView添加到Window的过程
我们根据下图步骤来解析DecorView添加到Window的过程,以便让我们更容易的理解。
**Activity初始化:
**Activity启动,关于Activity的创建过程啊或者其他细节,因为不是本篇幅重点故不做详细讨论。
我们尽量简化理解View的绘制流程。
PhoneWindow的创建:
Activity对象创建完成后,初始化了PhoneWindow对象,该Window在Activity的attach()函数中mWindow=newPhoneWindow(this);创建,相关代码块如下:
finalvoidattach(Contextcontext,ActivityThreadaThread..){
..........
mFragments.attachHost(null/*parent*/);
//创建PhoneWindow对象
mWindow=newPhoneWindow(this);
mWindow.setCallback(this);
mWindow.setOnWindowDismissedCallback(this);
mWindow.getLayoutInflater().setPrivateFactory(this);
..........
}
DecorView添加Window:
ActivityThread.Java类会调用handleResumeActivity方法将顶层视图DecorView添加到PhoneWindow窗口,因此通过PhoneWindow的setContentView将Activity与Window进行关联了。
finalvoidhandleResumeActivity(IBindertoken,
booleanclearHide,booleanisForward,booleanreallyResume){
//获得当前Activity的PhoneWindow对象
r.window=r.activity.getWindow();
//获得当前PhoneWindow内部类DecorView对象
Viewdecor=r.window.getDecorView();
//设置DecorView为可见
decor.setVisibility(View.INVISIBLE);
//获取Activity的WindowManager
ViewManagerwm=a.getWindowManager();
WindowManager.LayoutParamsl=r.window.getAttributes();
a.mDecor=decor;
l.type=WindowManager.LayoutParams.TYPE_BASE_APPLICATION;
l.softInputMode|=forwardBit;
if(a.mVisibleFromClient){
//标记已添加至Window
a.mWindowAdded=true;
//添加DecorView到Window
wm.addView(decor,l);
}
}
接着DecorView通过WindowManager设置到ViewRootImpl中,然后就是下面DecorView的绘制流程了。
因此我们知道在Activity的onCreate和onResume方法中调用View.getWidth()和View.getMeasuredHeight()返回值是0,因为View还没有开始绘制。
View的绘制过程
ViewRootImpl是连接WindowManager与DecorView的纽带,View的整个绘制流程的三大步(measure、layout、draw)都是通过ViewRootImpl完成的,
绘制是从根节点开始,对布局树进行measure和draw。
整个View树的绘图流程在ViewRootImpl.java类的performTraversals()函数展开,该函数所做的工作可简单概括为是否需要重新计算视图大小(measure)、是否需要重新安置视图的位置(layout)、以及是否需要重绘(draw),结合DecorView添加至Window过程,整体大概的流程图如下:
那么我们围绕图上过程来分析View的绘制流程,首先我们进入ViewRootImpl.java中,查看performTraversals函数,这个函数非常长,View的绘制三大流程将在此展开。
“`privatevoidperformTraversals(){
//缓存DecorView,因为在下面用的比较多
finalViewhost=mView;
…..
if(measureAgain){
if(DEBUG_LAYOUT)Log.v(TAG,
“Andheylet’smeasureoncemore:
width=”+width
+”height=”+height);
performMeasure(childWidthMeasureSpec,childHeightMeasureSpec);
}
…..
//获得view宽高的测量规格,mWidth和mHeight表示窗口的宽高,lp.width和lp.height表示DecorView根布局宽和高
intchildWidthMeasureSpec=getRootMeasureSpec(mWidth,lp.width);
intchildHeightMeasureSpec=getRootMeasureSpec(mHeight,lp.height);
//执行测量操作
performMeasure(childWidthMeasureSpec,childHeightMeasureSpec);
.....
//执行布局操作
performLayout(lp,desiredWindowWidth,desiredWindowHeight);
......
//执行绘制操作
performDraw();
}
“`
主要分下面三大步骤。
measure
measure操作主要用于计算视图的大小
我们知道View的MeasureSpec由父容器的MeasureSpec和其自身的LayoutParams共同确定,而对于DecorView是由它的MeasureSpec由窗口尺寸和其自身的LayoutParams共同确定。
在ViewRootImpl的performTraversals方法中,完成了创建DecorView的MeasureSpec的过程,相应的代码片段如下:
//获得view宽高的测量规格,mWidth和mHeight表示窗口的宽高,lp.width和lp.height表示DecorView根布局宽和高
intchildWidthMeasureSpec=getRootMeasureSpec(mWidth,lp.width);
intchildHeightMeasureSpec=getRootMeasureSpec(mHeight,lp.height);
我们知道Activity的根视图总是全屏的,因为ViewRootImpl在创建DecorView的MeasureSpec的过程测量模式是EXACTLY,而Size是windowSize,相应的代码片段如下:
privatestaticintgetRootMeasureSpec(intwindowSize,introotDimension){
intmeasureSpec;
switch(rootDimension){
//匹配父容器时,测量模式为MeasureSpec.EXACTLY,测量大小直接为屏幕的大小,也就是充满真个屏幕
caseViewGroup.LayoutParams.MATCH_PARENT:
//Windowcan'tresize.ForcerootviewtobewindowSize.
measureSpec=MeasureSpec.makeMeasureSpec(windowSize,MeasureSpec.EXACTLY);
break;
......
}
returnmeasureSpec;
}
View的measure过程
measure在performMeasure开始的,该函数在view中定义为final类型,要求子类不能修改。
measure()函数中又会调用onMeasure()函数,相应的代码片段如下:
publicfinalvoidmeasure(intwidthMeasureSpec,intheightMeasureSpec){
...........
//如果上一次的测量规格和这次不一样,重新测量视图View的大小
if((mPrivateFlags&PFLAG_FORCE_LAYOUT)==PFLAG_FORCE_LAYOUT||
widthMeasureSpec!
=mOldWidthMeasureSpec||
heightMeasureSpec!
=mOldHeightMeasureSpec){
//firstclearsthemeasureddimensionflag
mPrivateFlags&=~PFLAG_MEASURED_DIMENSION_SET;
resolveRtlPropertiesIfNeeded();
intcacheIndex=(mPrivateFlags&PFLAG_FORCE_LAYOUT)==PFLAG_FORCE_LAYOUT?
-1:
mMeasureCache.indexOfKey(key);
if(cacheIndex<0||sIgnoreMeasureCache){
//measureourselves,thisshouldsetthemeasureddimensionflagback
onMeasure(widthMeasureSpec,heightMeasureSpec);
mPrivateFlags3&=~PFLAG3_MEASURE_NEEDED_BEFORE_LAYOUT;
}else{
longvalue=mMeasureCache.valueAt(cacheIndex);
//Castingalongtointdropsthehigh32bits,nomaskneeded
setMeasuredDimensionRaw((int)(value>>32),(int)value);
mPrivateFlags3|=PFLAG3_MEASURE_NEEDED_BEFORE_LAYOUT;
}...........
}
实际为整个Viewtree计算大小是onMeasure()函数,里面直接调用setMeasuredDimension()提供一个默认模式View计算大小,相应的代码片段如下:
protectedvoidonMeasure(intwidthMeasureSpec,intheightMeasureSpec){
setMeasuredDimension(getDefaultSize(getSuggestedMinimumWidth(),widthMeasureSpec),getDefaultSize(getSuggestedMinimumHeight(),heightMeasureSpec));
}
其中默认使用getDefaultSize()获取默认尺寸大小,如果自定义View不重写onMesure(),在布局中使用wrap_content就相当于使用match_parent的效果相应的代码片段如下:
publicstaticintgetDefaultSize(intsize,intmeasureSpec){
intresult=size;
//获得测量模式
intspecMode=MeasureSpec.getMode(measureSpec);
//获得父亲容器留给子视图View的大小
intspecSize=MeasureSpec.getSize(measureSpec);
switch(specMode){
caseMeasureSpec.UNSPECIFIED:
result=size;
break;
caseMeasureSpec.AT_MOST:
caseMeasureSpec.EXACTLY:
result=specSize;
break;
}
returnresult;
}
普通View的measure()函数是由ViewGroup在measureChild方法中调用的,ViewGroup调用其子View的measure时即传入了该子View的widthMeasureSpec和heightMeasureSpec,共同决定了View的大小。
而DecorView是继承自FrameLayout的,所以我们看下面ViewGroup的measure过程。
ViewGroup的measure过程
ViewGroup需要先完成子View的measure过程,才能完成自身的measure过程,在ViewGroup的onMeasure()函数中,不同的布局(LinearLayout、RelativeLayout、FrameLayout等等)有不同的实现。
FrameLayout的onMeasure()方法代码如下:
protectedvoidonMeasure(intwidthMeasureSpec,intheightMeasureSpec){
//获取子View的个数
intcount=getChildCount();
finalbooleanmeasureMatchParentChildren=
MeasureSpec.getMode(widthMeasureSpec)!
=MeasureSpec.EXACTLY||
MeasureSpec.getMode(heightMeasureSpec)!
=MeasureSpec.EXACTLY;
mMatchParentChildren.clear();
intmaxHeight=0;
intmaxWidth=0;
intchildState=0;
for(inti=0;i finalViewchild=getChildAt(i); if(mMeasureAllChildren||child.getVisibility()! =GONE){ //测量FrameLayout下每个子视图View的宽和高 measureChildWithMargins(child,widthMeasureSpec,0,heightMeasureSpec,0); finalLayoutParamslp=(LayoutParams)child.getLayoutParams(); maxWidth=Math.max(maxWidth, child.getMeasuredWidth()+lp.leftMargin+lp.rightMargin); maxHeight=Math.max(maxHeight, child.getMeasuredHeight()+lp.topMargin+lp.bottomMargin); childState=combineMeasuredStates(childState,child.getMeasuredState()); if(measureMatchParentChildren){ if(lp.width==LayoutParams.MATCH_PARENT|| lp.height==LayoutParams.MATCH_PARENT){ mMatchParentChildren.add(child); } } } } ............. } 至此View的measure过程大致清楚了,下面是View的layout过程。 layout layout在view中定义为final类型,要求子类不能修改,用于设置子View的位置,因而是由父容器获取子View的位置参数后,调用child.layout方法并传入已获取的位置参数,从而完成对子View的layout。 相应的代码片段如下: publicvoidlayout(intl,intt,intr,intb){ //判断是否需要重新测量 if((mPrivateFlags3&PFLAG3_MEASURE_NEEDED_BEFORE_LAYOUT)! =0){ onMeasure(mOldWidthMeasureSpec,mOldHeightMeasureSpec); mPrivateFlags3&=~PFLAG3_MEASURE_NEEDED_BEFORE_LAYOUT; } intoldL=mLeft; intoldT=mTop; intoldB=mBottom; intoldR=mRight; booleanchanged=isLayoutModeOptical(mParent)? setOpticalFrame(l,t,r,b): setFrame(l,t,r,b); //判断布局是否发生改变,重新布局 if(changed||(mPrivateFlags&PFLAG_LAYOUT_REQUIRED)==PFLAG_LAYOUT_REQUIRED){ //回调onLayout的方法,该方法由ViewGroup实现 onLayout(changed,l,t,r,b); mPrivateFlags&=~PFLAG_LAYOUT_REQUIRED; ListenerInfoli=mListenerInfo; if(li! =null&&li.mOnLayoutChangeListeners! =null){ ArrayList (ArrayList intnumListeners=listenersCopy.size(); for(inti=0;i listenersCopy.get(i).onLayoutChange(this,l,t,r,b,oldL,oldT,oldR,oldB); } } } mPrivateFlags&=~PFLAG_FORCE_LAYOUT; mPrivateFlags3|=PFLAG3_IS_LAID_OUT; } 通过上面代码我们知道layout主要完成两个操作: setFrame(l,t,r,b),l,t,r,b即子视图在父视图中的具体位置,该函数用于将这些参数保存起来,onLayout()是空方法由ViewGroup实现,在ViewGroup中,onLayout是一个抽象方法,因为对于不同的布局管理器类,对子元素的布局方式是不同的。 而DecorView是继承自FrameLayout的,所以我们看下面DecorView的onLayout代码片段: @Override protectedvoidonLayout(booleanchanged,intleft,inttop,intright,intbottom){ layoutChildren(left,top,right,bottom,false/*noforceleftgravity*/); } voidlayoutChildren(intleft,inttop,intright,intbottom, boolean


- 配套讲稿:
如PPT文件的首页显示word图标,表示该PPT已包含配套word讲稿。双击word图标可打开word文档。
- 特殊限制:
部分文档作品中含有的国旗、国徽等图片,仅作为作品整体效果示例展示,禁止商用。设计者仅对作品中独创性部分享有著作权。
- 关 键 词:
- Android 面试题总结之Android 进阶二 试题 总结 进阶
 冰豆网所有资源均是用户自行上传分享,仅供网友学习交流,未经上传用户书面授权,请勿作他用。
 #2机组现场施工用电布置措施.docx
-
《个人贵金属质押借款合同》兴业银行.docx
-
《科学发展观和小康社会的经济建设》复习导学案.docx
-
《我和祖父的园子》第一课时教案两篇word.docx
-
《质量》教学案例与设计.docx
-
2惠农小册子.docx
-
7A版个人与团队模拟考试题及答案.docx
-
10篇新部编四年级下册语文课内外阅读理解专项练习题及答案.docx
-
16初四物理热和能知识点总结精讲.docx
-
20XX社会语言经典语录流行风暴.docx
-
48篇教学案例分析报告题.docx
-
《电子工厂安全管理制度汇总》.docx
-
《机械制造课程设计》指导.docx
-
《钱学森》教案第二课时.docx
-
《边城》读后感5篇.docx
-
《固定式压力容器安全技术监察规程》.docx
-
《论雷峰塔的倒掉》.docx
-
《手术台就是阵地》教学设计三年级语文下册.docx
-
《夏洛的网》课外阅读教学设计.docx
-
《自己的花是让别人看的》教案.docx
-
3C检查表090429.docx
-
7客运专线CRTSⅡ型板式无砟轨道施工工法.docx
-
《笔算除法》课时教案设计.docx
-
11#楼高大模板支撑体系专项方案.docx
-
17科学分析经济形势.docx
-
《电流和电路》易错题精讲综合检测题与答案.docx
-
《会计信息系统》习题含答案.docx
-
《汽车电器设备与维修》发电机分教考分离试题及标准答案.docx
-
《四川省排污许可证管理暂行办法》.docx
-
《新编实用英语》教案第一册Unit.docx
-
0母版锅炉值班员计算题WORD版.docx
-
3年级下册英语单词记忆人教版.docx
-
江苏省兴洪中学学年度第一学期第二周检测卷九年级历史无答案.docx
-
江苏省扬州市学年高二生物上学期期末考试试题20含答案.docx
-
江西美术出版社五年级美术上册教案.docx
-
建筑质检员个人工作总结.docx
-
健康养生养生先养心细说心事养生系列1.docx
-
江苏省南京市高考二模试题语文.docx
-
教程操作系统 Windows XP注册表修改精粹.docx
-
江苏省沭阳县修远中学学年九年级上学期期末语文试题.docx
-
江苏省届高考生物压轴卷.docx
-
建筑安装工程费用项目组成参考模板.docx
-
江苏省南京市玄武区中考数学二模试题.docx
-
建筑工程管理工程部精细化细则.docx
-
江苏省苏州市高新区七年级英语下学期学业质量测试期末试题无答案 牛津译林版.docx
-
建筑工程消防系统维护方案.docx
-
建筑装饰材料挥发性有机物及去除设备研究现状.docx
-
交通事故应急处置预案.docx
-
江苏南京市盐城市届高三第一次模拟考试生物试题Word版含答案.docx
-
教师跟岗学习自我鉴定.docx
-
教师五四演讲稿与教师代表六一国际儿童节发言稿汇编.docx
